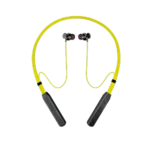
How To Reset Neckband Bluetooth Earphones, Bluetooth neckband earphones are a popular choice for music lovers, fitness enthusiasts, and anyone who enjoys hands-free listening. They offer the convenience of wireless audio with the added comfort of a neckband design. However, like all electronic devices, they can sometimes experience connectivity issues, pairing problems, or malfunctions. If you find yourself in such a situation, resetting your neckband Bluetooth earphones can often resolve the issue.
Here’s a step-by-step guide on how to reset neckband Bluetooth earphones and restore them to their default settings.
Step 1: Identify the Reset Button or Method
The first step in resetting your neckband Bluetooth earphones is identifying the reset button or method. Different earphones may have different methods depending on the brand and model. Generally, you will find the reset procedure outlined in the user manual, but here are some common approaches:
- Dedicated Reset Button: Some neckband earphones come with a small reset button located on the device’s control unit. It may be a tiny hole that requires a pin or paperclip to press.
- Multi-Function Button Reset: For many models, the reset can be done by holding down the multi-function button (usually the power button) for a certain period, typically 10-15 seconds.
Step 2: Turn Off the Earphones
Before resetting, ensure that your earphones are powered off. If your neckband Bluetooth earphones are still on, hold down the power button until the power turns off. This will prevent accidental pairing or interference during the reset process.
Step 3: Reset the Earphones
Once the earphones are off, follow the reset method for your specific model. If it involves pressing the reset button, use a paperclip or pin to gently press the button. For the multi-function button reset, press and hold the power button for 10-15 seconds. You may notice an LED light flashing, indicating the reset process has started.
Step 4: Clear Bluetooth Pairings
After resetting your neckband Bluetooth earphones, it’s a good idea to clear any existing Bluetooth pairings from your device. This can help prevent connection conflicts. Go to your phone or device’s Bluetooth settings and remove or forget the earphones from the paired devices list. This ensures that your earphones will pair fresh the next time you attempt to connect.
Step 5: Re-pair Your Earphones
Once your earphones are reset and the old pairings have been cleared, turn your earphones back on. Enter pairing mode by holding down the power button until the LED indicator starts flashing, signaling it is ready to pair. Now, go to the Bluetooth settings on your device, find the earphones in the available devices list, and select them to connect.
Step 6: Test Your Earphones
Once connected, test the functionality of your earphones. Play some audio or try making a call to ensure that both sound quality and microphone function are working as expected. If the earphones still aren’t working as they should, consider repeating the reset process or checking for software updates from the manufacturer.
Additional Tips for Maintaining Your Neckband Bluetooth Earphones
- Regular Software Updates: Some earphones, especially premium models, may receive firmware updates that improve performance or fix bugs. Check if there’s a dedicated app for your earphones to ensure they’re up-to-date.
- Avoid Overcharging: Avoid keeping your earphones plugged in after they’ve reached 100% charge. This can help preserve the battery’s lifespan.
- Clean Your Earphones: Dirt and sweat can build up over time, affecting both comfort and sound quality. Regularly clean your earphones with a soft cloth and avoid getting moisture into the earphone speakers.
Conclusion
Learning how to reset neckband Bluetooth earphones is a handy skill that can help you troubleshoot common issues like connectivity problems, audio malfunctions, and pairing errors. By following the reset steps above and taking good care of your earphones, you can enjoy seamless wireless audio for longer.
You Might Also Like These:


No Comment! Be the first one.